You can change the MAC address for the network card in Windows pretty easily following the steps below.
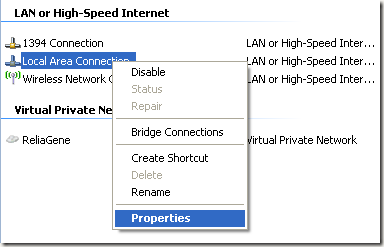
Step 1: Click on Start, then Control Panel, then Network Connections, and right-click on the network connection you want to change the MAC address for and select Properties. It will normally either be Local Area Connection or Wireless Network Connection.
If you are using Windows Vista, Windows 7 or higher, you have to go to Control Panel, then Network and Internet, then Network and Sharing Center, and then click on Manage Network Connections or Change adapter settings.

Then you can right-click on the adapter and choose Properties.
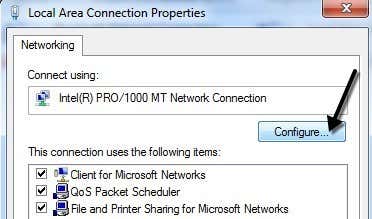
Step 2: On the General or Networking tab, click the Configure button.
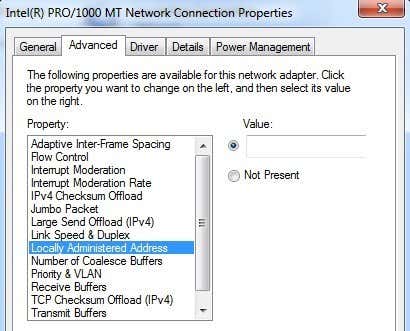
Step 3: Now click on the Advanced tab and click on the Locally Administered Address property or the Network Address property.
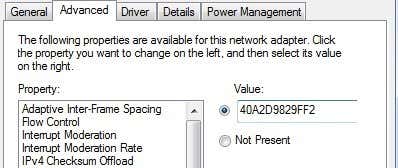
By default, the Not Present value is selected. Go ahead and click on the Value radio button and enter in a new MAC address. The MAC address is a combination of 6 pairs of numbers and characters, i.e. 40-A2-D9-82-9F-F2. You should enter the MAC address without the dashes.
You can go to the command prompt and type in IPCONFIG /ALL to check that the MAC address has been changed. Go ahead and restart the computer in order for the changes to take effect.
This is the simplest way to change your MAC address in Windows. You can also do so via the registry, but it’s much more technical and probably not required by most people.
Step 1: Click on Start, then Control Panel, then Network Connections, and right-click on the network connection you want to change the MAC address for and select Properties. It will normally either be Local Area Connection or Wireless Network Connection.
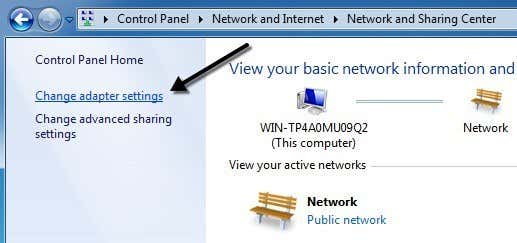
If you are using Windows Vista, Windows 7 or higher, you have to go to Control Panel, then Network and Internet, then Network and Sharing Center, and then click on Manage Network Connections or Change adapter settings.
Then you can right-click on the adapter and choose Properties.
Step 2: On the General or Networking tab, click the Configure button.
Step 3: Now click on the Advanced tab and click on the Locally Administered Address property or the Network Address property.
By default, the Not Present value is selected. Go ahead and click on the Value radio button and enter in a new MAC address. The MAC address is a combination of 6 pairs of numbers and characters, i.e. 40-A2-D9-82-9F-F2. You should enter the MAC address without the dashes.
You can go to the command prompt and type in IPCONFIG /ALL to check that the MAC address has been changed. Go ahead and restart the computer in order for the changes to take effect.
This is the simplest way to change your MAC address in Windows. You can also do so via the registry, but it’s much more technical and probably not required by most people.
